
We have lost a brilliant mind and a creative genius. Steve Jobs changed the way I think about design. I will always be grateful.
Rest in peace, Steve. You will be missed.
AisleOne. A visual journal on design, photography, film, music and culture.
We have lost a brilliant mind and a creative genius. Steve Jobs changed the way I think about design. I will always be grateful.
Rest in peace, Steve. You will be missed.

For the last 6 years or so, my backup setup consisted of one unreliable 120 GB drive that I would manually update whenever I remember to do so. That’s pretty much a pathetic way to go about it and I’ve been extremely lucky to not have had a catastrophic drive failure.
I’ve been meaning to get serious about my file management, but I never did anything about it. That’s until I read Frank Chimero’s insightful article about his setup and how he deals with file management. It motivated me to finally put a system together to protect my important files, and to write this article detailing my current setup. I figured that it can’t hurt to have more information available on the subject for those who are interested.
The Equipment
Right away, I knew that my lame 120 GB drive wouldn’t make a good base for my setup. The key factor in any good backup system is redundancy. The more copies you have of your data, the safer you are. I first looked into RAID 1 systems. A RAID 1 system is essentially made up of two drives, one drive is where you backup your data, and the other drive is used to mirror that drive, creating a backup of your backup. The benefit of a RAID 1 is that it all happens on the fly, so when data is stored to the first drive, it’s instantly mirrored to the second drive. I found a few options that might work, but they were either too expensive or noisy.
I then looked into single hard drives, which had to be quiet and large enough to store all of my data. To create redundancy I knew that I’d needed two separate drives. After a few days of researching and asking on Twitter, I purchased two Lacie Quadra 1 TB drives. They’re silent, affordable, offer four connection interfaces and look damn sexy.
To build on the setup, I also signed up for Backblaze, an online file backup service that’s really cheap and easy to use. The service constantly checks your machine and external drives to see if anything has changed and needs a backup. It all happens in the background, so you just set it up and never think about it again. The first backup does take a few days, though, depending on the amount of data you’re storing. They have a free 15 trial, which is a great way to test it out.
I also purchased SuperDuper, an inexpensive desktop app that allows you to completely clone your machine, creating a bootable copy. You can even schedule backups, which is great.
Finally, the system also makes use of Dropbox and Apple’s iDisk. More details below on how I use these two services.
The Setup
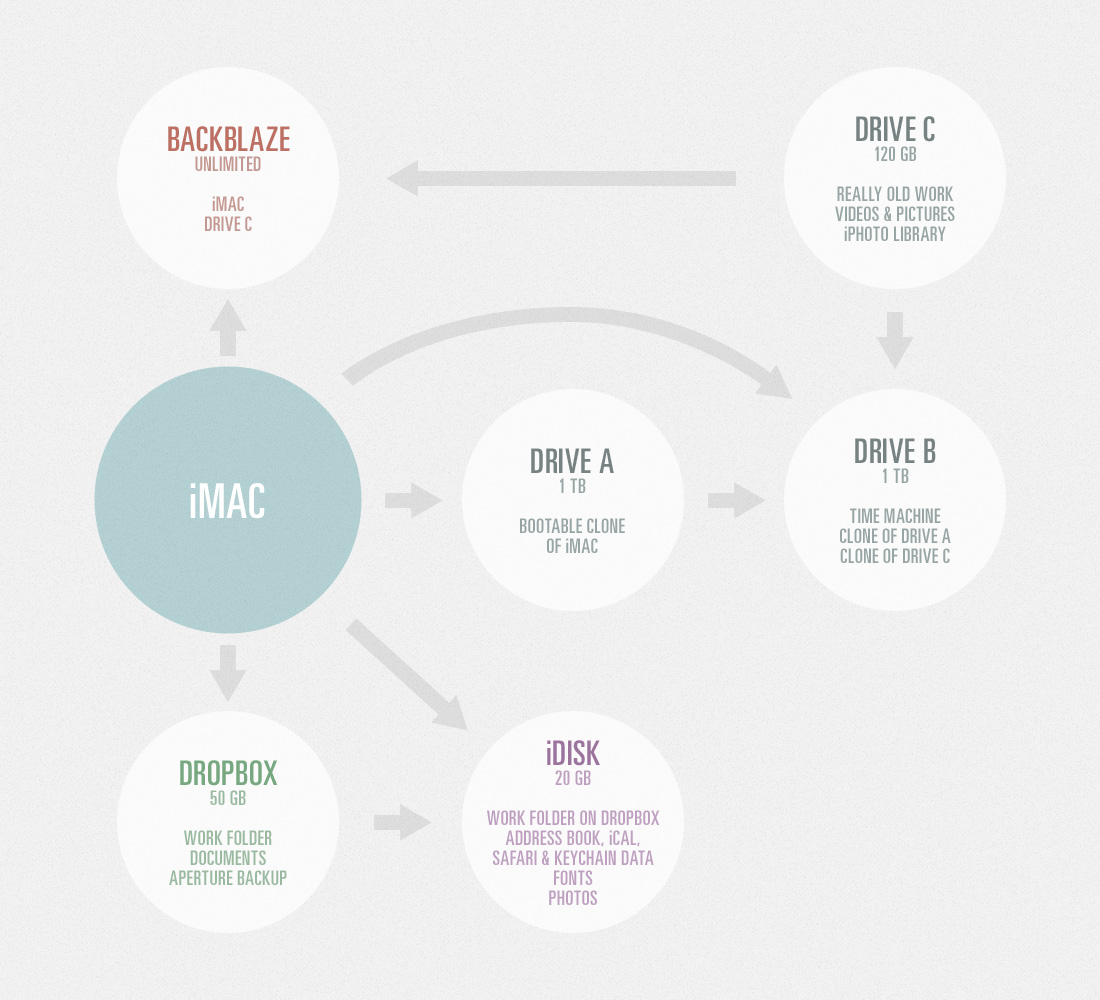
I put together this diagram to help visualize my setup. Here’s how it works:
All of my data is kept on my iMac’s internal drive. Current and archived work files, important documents like my resume, and my Aperture Library Backup, live in my Dropbox folder. I do this to create more redundancy for my most important data.
I’ve kept my old 120 GB drive and use it to store really old work, videos, pictures and my iPhoto Library. This is not precious data.
Every other day I have SuperDuper clone my iMac to one of my Lacie 1 TB drives, lets call this one Drive A. Immediately after that is done I have SuperDuper clone Drive A to my other Lacie 1 TB drive, let’s call this one Drive B. Once a month SuperDuper clones my 120 GB drive to Drive B. I only do it once a week because the data on that drive won’t change that often. All of the SuperDuper backups are set to Smart Update. It’s a great feature that only copies files and folders that are new or have changed. This considerably speeds up the process after the initial backup.
Once a week the current work folder in Dropbox, my Address Book and iCal databases, Safari settings, keychain, fonts and current photos are copied to iDisk using Apple’s Backup app.
For extra security, I’ve setup Backblaze to constantly backup my iMac’s internal drive, which includes my Dropbox local folder, and the 120 GB drive.
During all this I have Time Machine constantly backing-up to Drive B.
This setup creates 6 copies of my vital data:
– Internal iMac Drive
– External Drive A
– External Drive B
– Dropbox
– iDisk
– Backblaze
and 3 copies of my unimportant data:
– External 120 GB Drive
– External Drive B
– Backblaze
This is a good amount of redundancy and will provided a good level of security and piece of mind. I’ll probably expand on this in the future. Those Lacie drives are cheap, so why not get another one to clone one of the other drives. Eventually, I want to have an off-site drive, just for added security.
When I was first looked into backup systems, I had no idea where to begin. Hopefully this article has been helpful to those who are still unsure on how to proceed. I also suggest reading this article by John Gruber for more information on the subject.

The iPhone 4. Simply amazing.

A new and improved site for Thinking for a Living has launched! The site, in my opinion, is at the forefront of interactive design. It’s a great example of why Flash isn’t the only means of creating a dynamic interactive experience.
The site was designed by BBDK and Frank Chimero and built by Jedi Knight Ian Coyle. It features keyboard navigation, a fine grid, and a ton of original and inspirational content.
I’m super excited and proud to be a part of this fine network of people and sites. TFAL is a must read for any creative type.
Howdy folks. Hope everyone is having a great holiday season. As you’ve noticed, I haven’t posted much in the last week and won’t resume until next week. Just enjoying this time off with the family.
Anyway, I just briefly want to mention that I’ll be launching a revamped site in about a week or so. I’m pretty happy with it and I think you’ll like it a lot. Emil Olsson of TypeNeu is doing all the coding and he’s implemented some awesome functionality. I’ll let you all know right before I switch over to the new design because the site will have to be done for a little while.
Also, if you look in the header, on the right, you’ll notice a small ad. AisleOne is now part of the Fusion Ad Network. It’s a great network that caters to designers, developers, publishers and creative professionals. The ads are small and for the most part well-designed and unobtrusive. I’ve always struggled with displaying ads on the site, I’ve been approached by many companies in the past, but this is the first time that I feel comfortable doing it. The network is great and this is an easy way to pay for the site hosting and other site related costs. I’d love to know what you think about the new ads since your opinions matter most to me.
This version of the site won’t be up for long so I plopped the ads at the top, but in the new site design I’ve placed them in a much better space that isn’t so distracting.
Well, that’s it for now. I want to wish everyone a Happy New Year! I’ll be back on Monday. Peace.

Yesterday I was searching around for tips on how to improve the overall performance of Photoshop. I found a bunch of good ones, but there was no site that included them all, at least not in a clean, simple layout that’s easy to read. So I decided to quickly put together a page since I figured it might be useful to others. I call it Photoshoptimize. Clever huh?
All these tips have improved overall performance, especially with redrawing the image when zooming or panning. Some of these tips might not fit your workflow, but the more you do the better.